Body Tube
We finished our body tube on 11/19, Thursday. Andrew did a demonstration of making a body tube using thick paper and wood glue. He showed us that you can build a body tube by precisely twirling a piece of thick paper along a PVC pipe so that it aligns correctly. After twirling three layers of the thick paper, you supervise it so that there aren't any bubbles that show up at the creasing. Andrew is letting us use the one he made in the demo. I'm happy I learned how to make a body tube that's pretty much a paper towel role, it was interesting to learn.
We finished our body tube on 11/19, Thursday. Andrew did a demonstration of making a body tube using thick paper and wood glue. He showed us that you can build a body tube by precisely twirling a piece of thick paper along a PVC pipe so that it aligns correctly. After twirling three layers of the thick paper, you supervise it so that there aren't any bubbles that show up at the creasing. Andrew is letting us use the one he made in the demo. I'm happy I learned how to make a body tube that's pretty much a paper towel role, it was interesting to learn.
Prior to Building the Fins
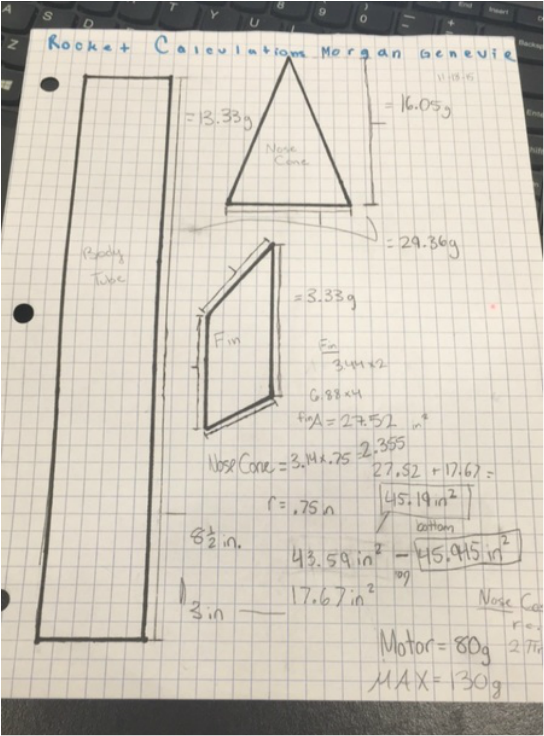
We had to find the center of mass and center of thrust, and from there calculate the surface area of the space above and below the center of thrust. Once we found the top half and bottom half, we had to make the fins a size with the surface area that would equal out the top and bottom parts of the rocket.
Fins
We started out with one clipped parallelogram shaped fin and used that to draw three more fins. The fin's material was thin balsa wood that we got from a box full of scraps of wood.
I came up with the idea of tracing a circle of our body tube onto a piece of paper, and then drawing 4 equal lines on the paper. Then placing the body tube where I drew the circle and drawing lines on the tube using the lines on the paper to indicate where the fins should be glued.
Before glueing the fins on, we weighed them and did the overall calculations for the rocket(which you can find at the top of this post). Morgan glued the fins on with super glue while I helped her make sure they were aligned correctly with each other.
After we finished glueing, we were told to account only one surface area for each fin instead of double the surface area as we had done in our calculations. The calculations were perfect when we counted both sides of the fins because both the top and bottom halves of our rocket were equal to each other. Instead of changing the size of our four fins, we just made four more. Adding the 4 fins (so we had 8 in total) evened out the weight of both sides of the rocket.
Nose Cone
Before we began building, I thought that constructing the nose cone would be the hardest to do. But it turned out to be the easiest because Andrew showed us that if a PVC cap could fit perfectly into the body tube we built, then it can be used as a nose cone. The PVC cap became even more convenient when the amount of weight it had helped to even out our rocket. It was also helpful in the way that it could fit in our body tube with enough resistance to avoid slipping out during the launch and slip out enough so the parachute can be deployed properly.
Parachute
We used a clean trash bag as the main material for our parachute. Using a makeshift compass, we drew a circle on the trash bag. So that punching holes near the edges of the trash bag could be done easily, we equally wrapped four pieces of duct tape around the edges of the circle. Then we punched in four holes in the duct tape and tied fishing line into the holes. With the four strings of fishing line, we tied it around the shock cord, therefore when the nose cone slips out during launch, the parachute can be deployed.
Engine Housing
We don't need anything to actually house our motor because our body tube is sized so the motor can be slipped in with only a metal clip to help it from falling out. Our classmate, Jesus, helped us with the metal clip. I think he was misinformed though because he told us that the end of the metal clip that was bent inside the body tube had to be long enough so the motor wouldn't slide upwards or anything. So on launch day we were told that we shouldn't have the end of the metal clip be that long, and he clipped it with pliers.
 RSS Feed
