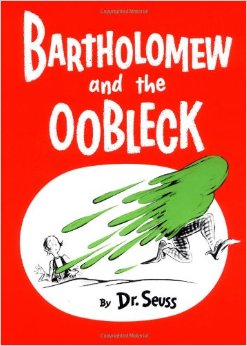
|
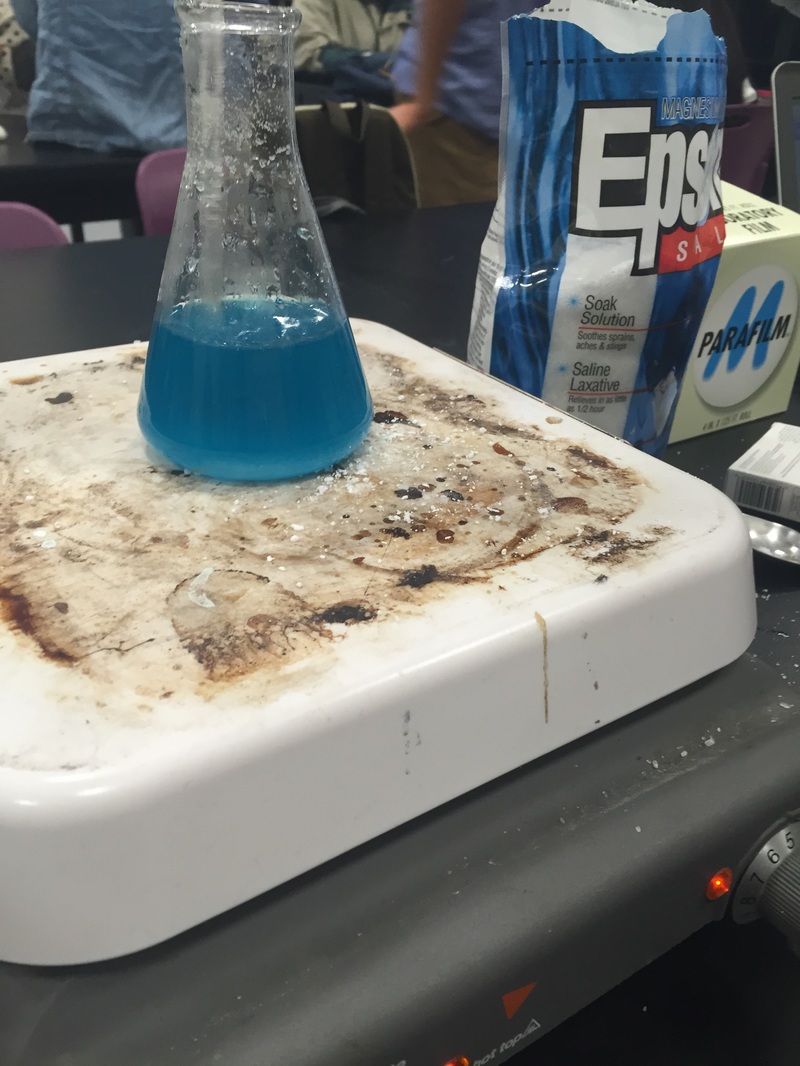
The subcategory of this Cosmos episode is the cosmic calendar. First, it began talking about how far space goes: Earth, Solar System, Milky Way Galaxy, Local Group, Virgo Supercluster, and then the Multiverse. He introduces Giodarno Bruno who believed that Earth was not the only planet and all the planets revolve around the Sun. No one believed him, he was imprisoned for many years and eventually killed, all for his beliefs that ended up being true . . . He walks you through the cosmic calendar year, naming dates where history occurred. Although, I was a little confused when he said "Moses was born 7 seconds ago, Buddha 6 seconds ago, jesus 5 seconds, muhammad 3 seconds ago, and not even 2 seconds ago, that for better or worse, 2 halves of the Earth discovered each other. It was only in the last second that we started using astronomy." I was confused because those things obviously could have happened seconds ago. I felt sorry fro Bruno. He tried persuading the Roman church to believe him and they imprisoned him! He wasn't even insulting God, I think he was actually praising him to a deeper level. Saying that not only did God create man and Earth, but he also created a variety of planets, a universe. Bruno gave them reason to believe that God was even greater than they imagined him to be. I think they should've welcomed the idea that Earth was not the only planet, not imprison the person that introduced. I found it really interesting and surprising that fragments of orbiting debris collided and coalesced until they snowballed to form our moon. I've never really asked myself the question, "how was the moon formed?" so I was very surprised when I learned that. Now I'm asking myself the question, "how do we even know that? Are these only theories?" I also found it interesting that writing was invented to keep track of inventory. You would think writing was invented because of some educational reason, but it was only invented so we could keep track of inventory. I love Cosmos so much, it's like a very interesting lecture! Worksheet:Take Home QuizTo prepare for this lab, Morgan and I researched ionic compounds, like any kind of salt. There is a large variety of salts to use, but after researching how these types of salts will transform into different-looking crystals, we wanted to use a type of salt that will turn into crystals that we would both like to see. In the end, we decided to use Epsom salt.  The supplies I needed for the crystallization lab (which I did with Morgan), were Epsom Salt, blue dye (we wanted to see if the crystals would actually turn blue), water from the tap, a spoon to pour the Epsom Salt inside, and a stir-rod to help dissolve the salt. We used an Erlenmeyer flask to dissolve the salt in the water and then after the salt couldn't dissolve into the water anymore, we poured what was in the flask into a normal cylinder shaped beaker.
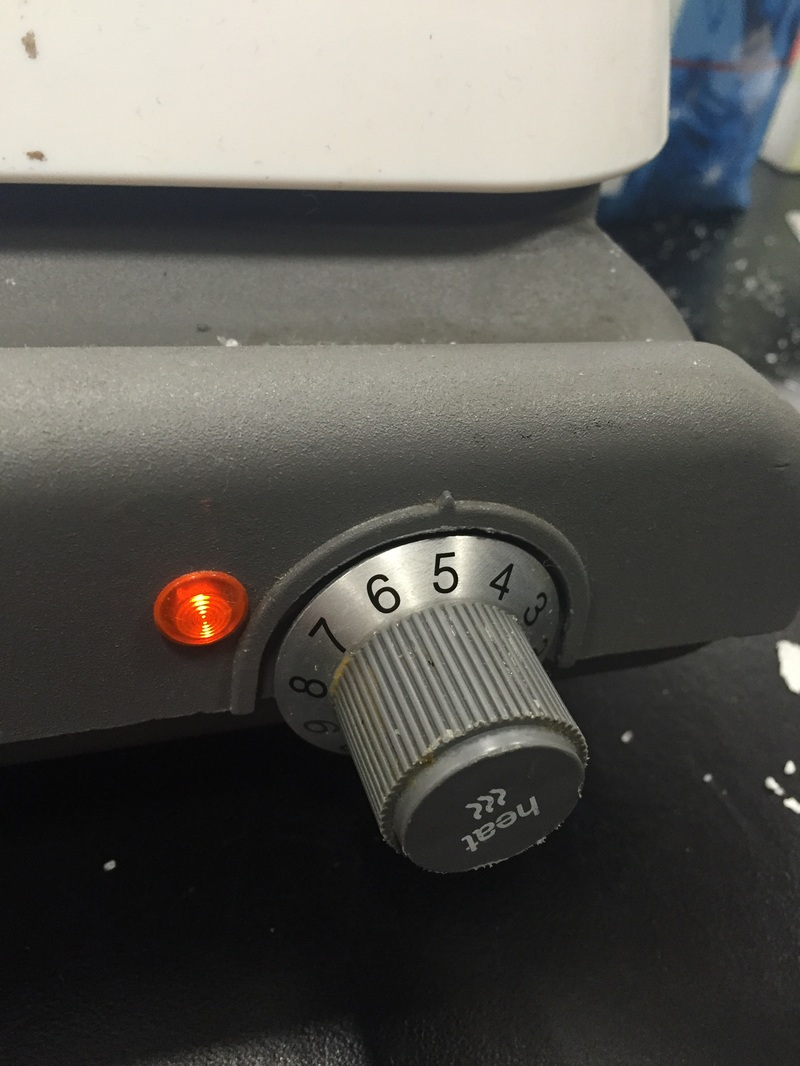
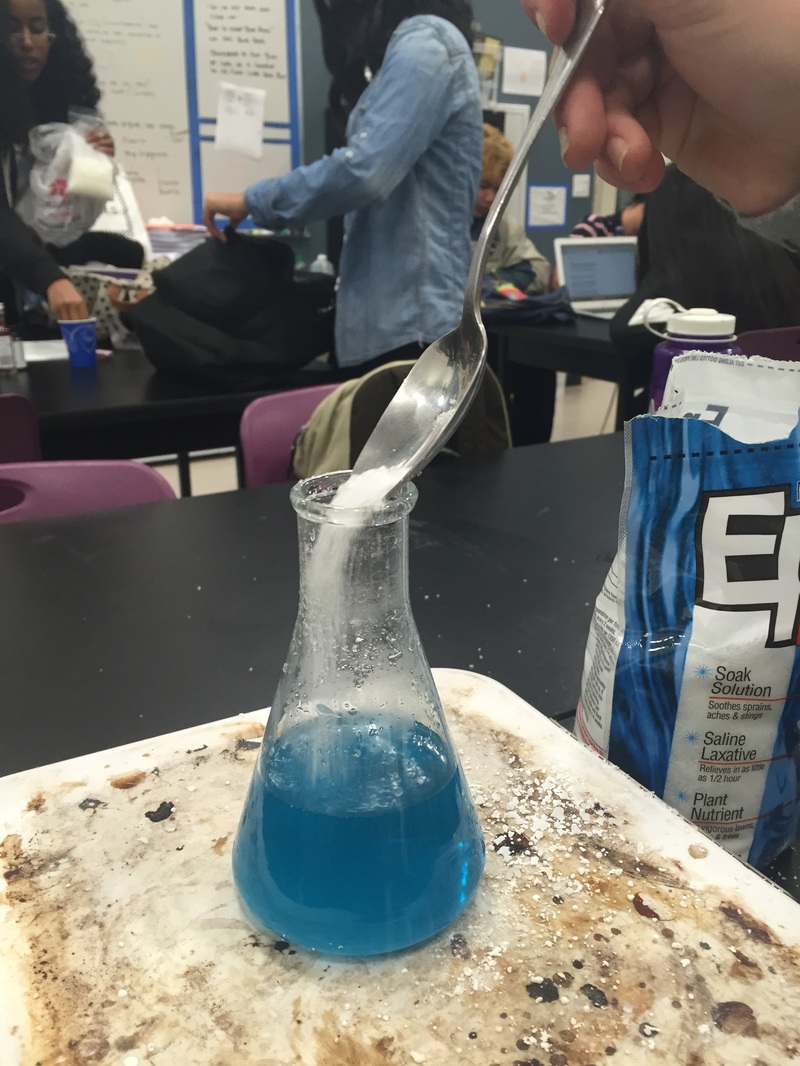
We began by filling the Erlenmeyer flask 1/3 of the way with water from the tap. Then we dropped some blue dye into the flask. We placed the flask onto the hot plate (the heat temperature was set at 5) then we poured some Epsom Salt into the flask using a spoon Andrew let us borrow.
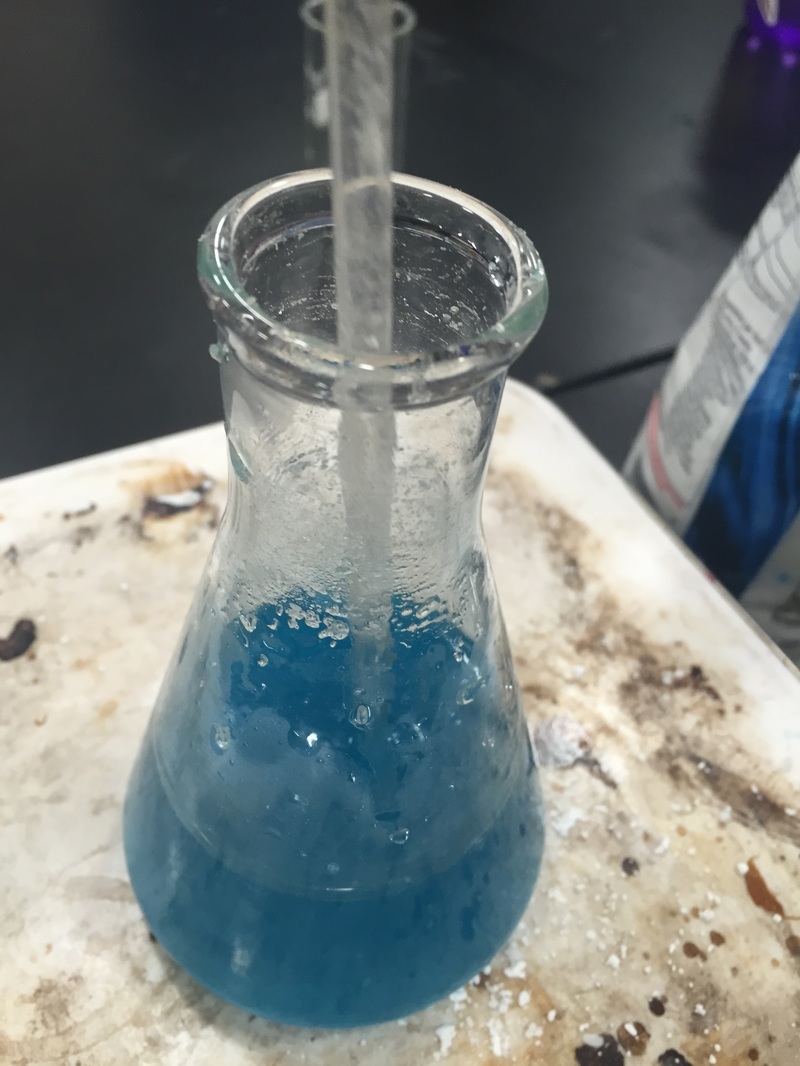
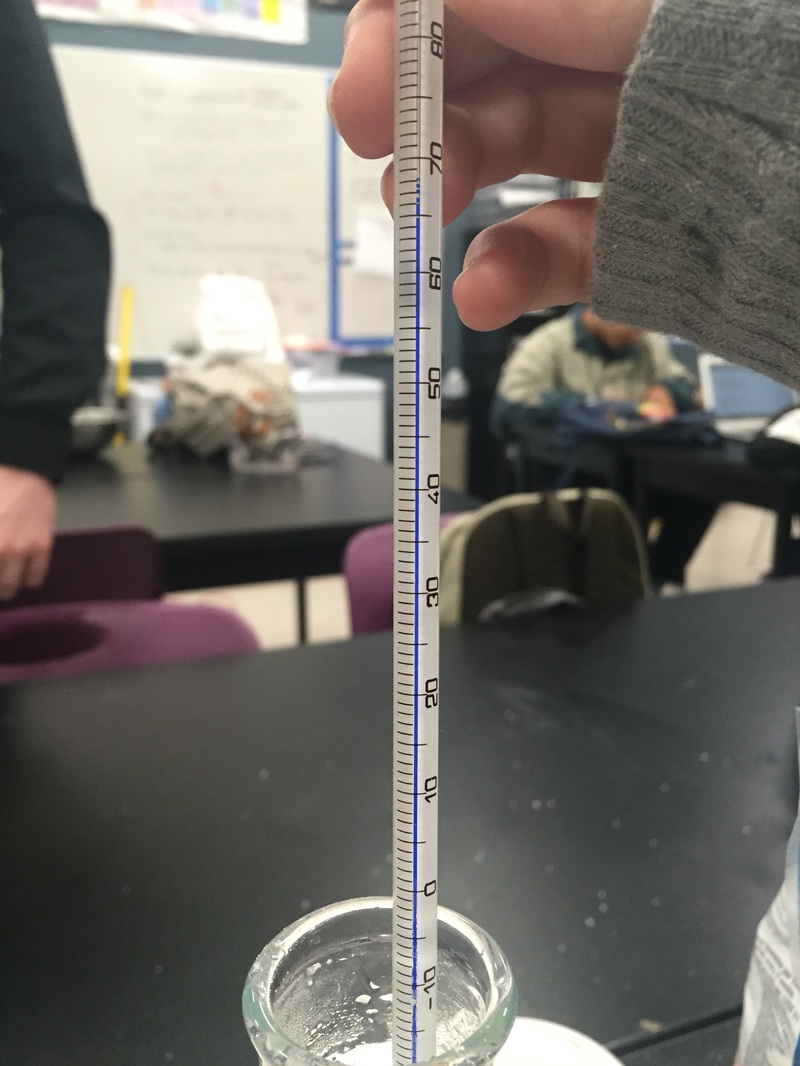
We stirred the Epsom Salt to help it dissolve. By turning up the heat temperature, we waited for the thermometer to go up to 70-80 degrees when we placed it inside the flask. 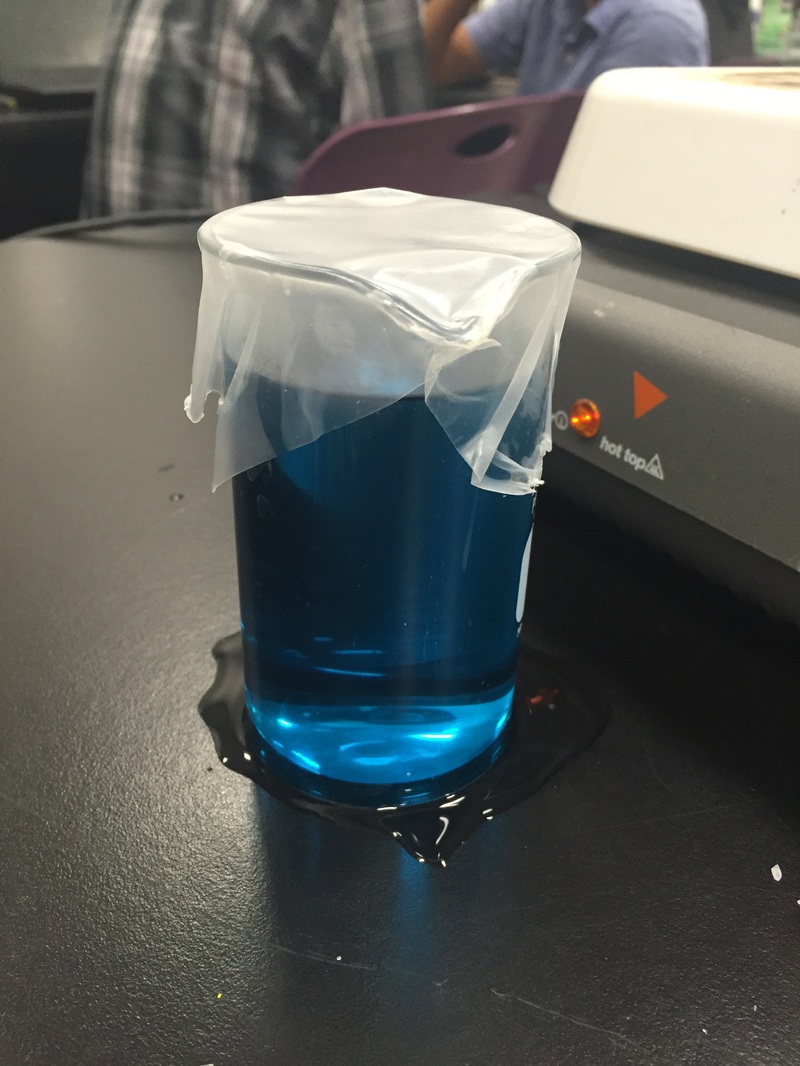 Once it got to around 75 degrees Celsius, we took it off the hot plate and wrapped some parafilm on top of the beaker. We came back the next day and saw that the dissolved epsom salt didn't turn into crystals at all. In fact, it looked exactly the same as when we placed it in the fume hood on the day before. Andrew said that we could dump out some of the water and pour some more Epsom salt inside the beaker to ensure that we will get crystals when we return the next day. Sure enough, we did. 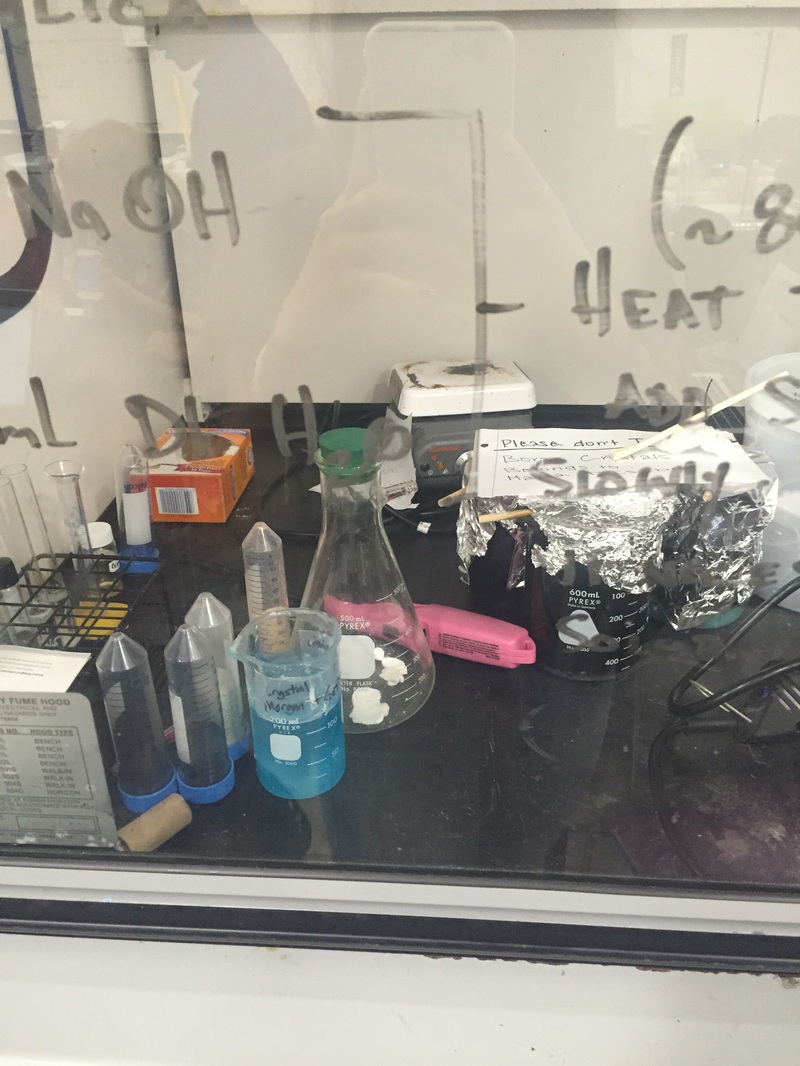 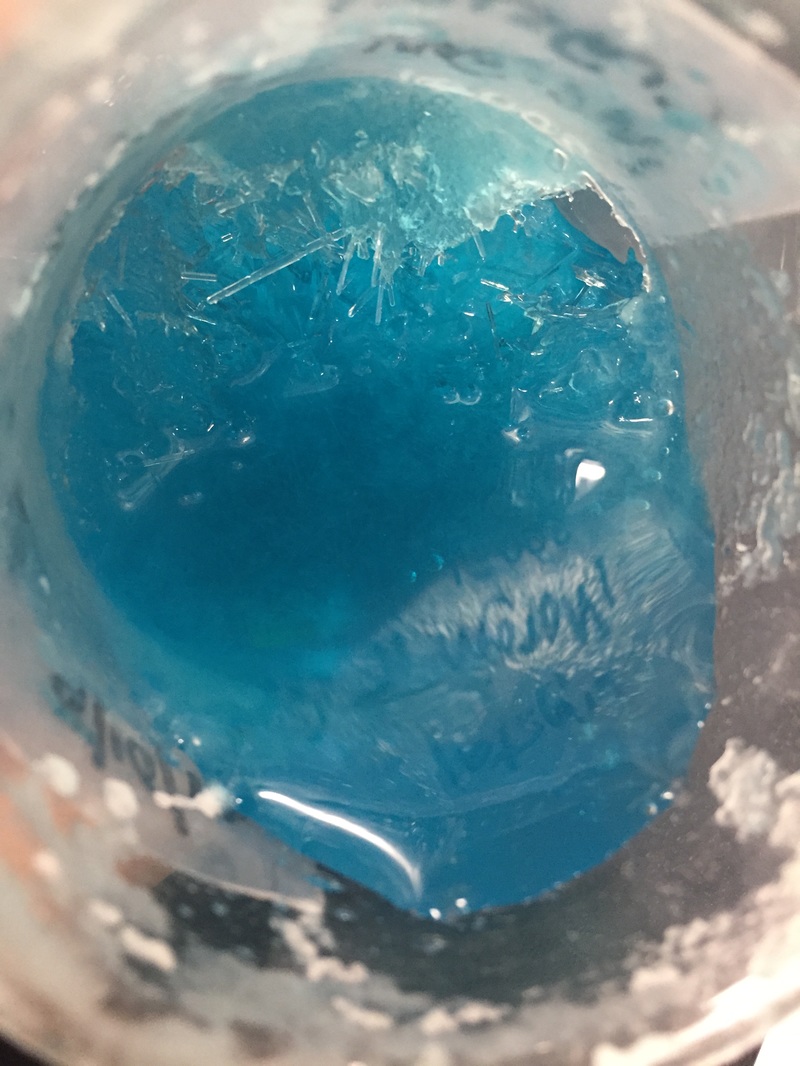 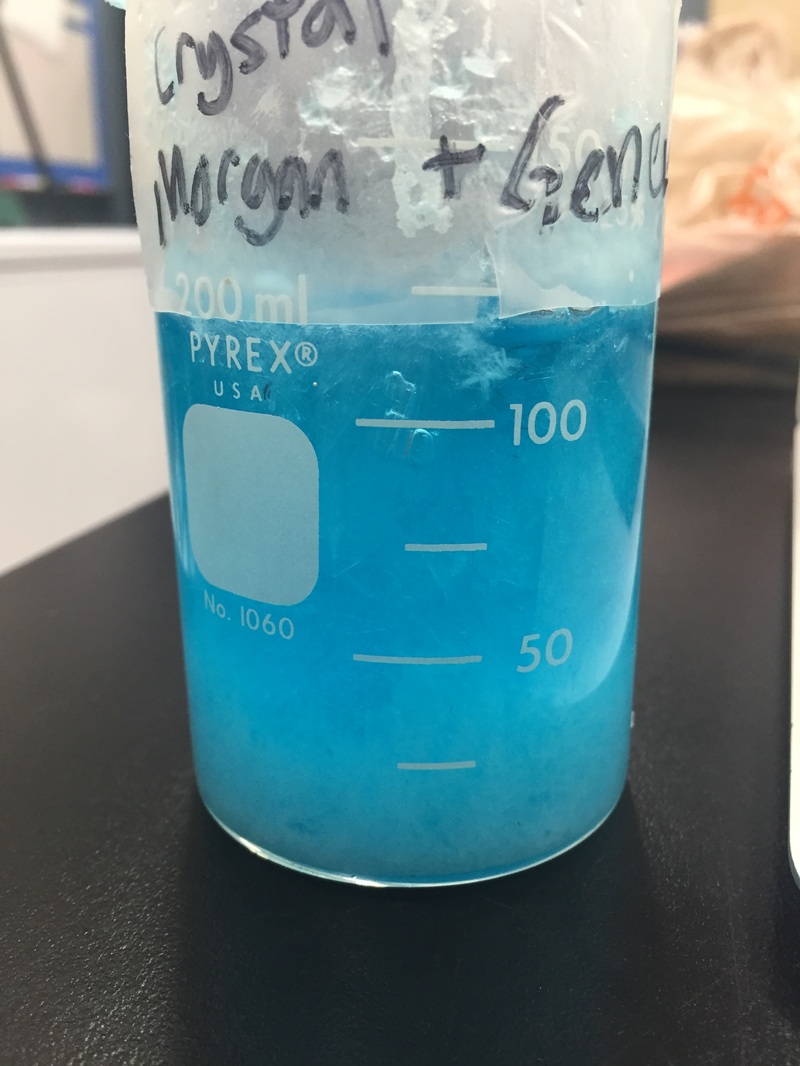 On Friday, we decided to leave the water with the dissolved Epsom salt water along with the already-formed crystals inside the beaker over the weekend. When we came back Monday, this is what the beaker looked like with all of the left over salt water gone. 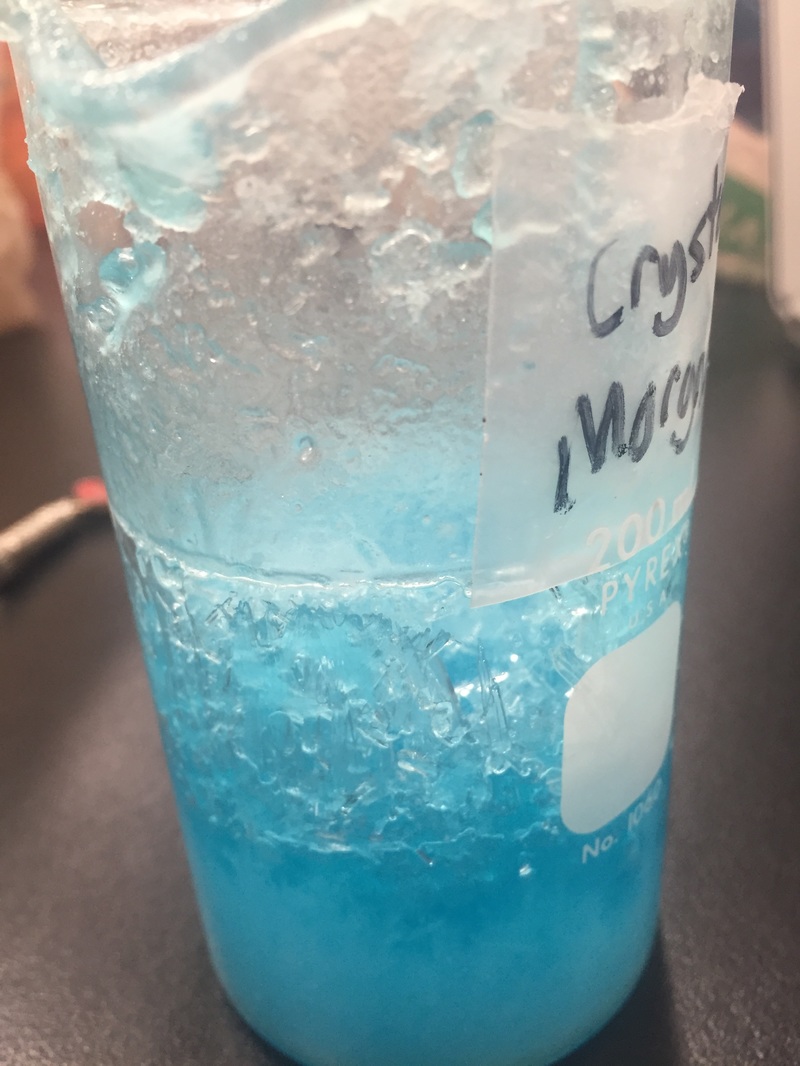 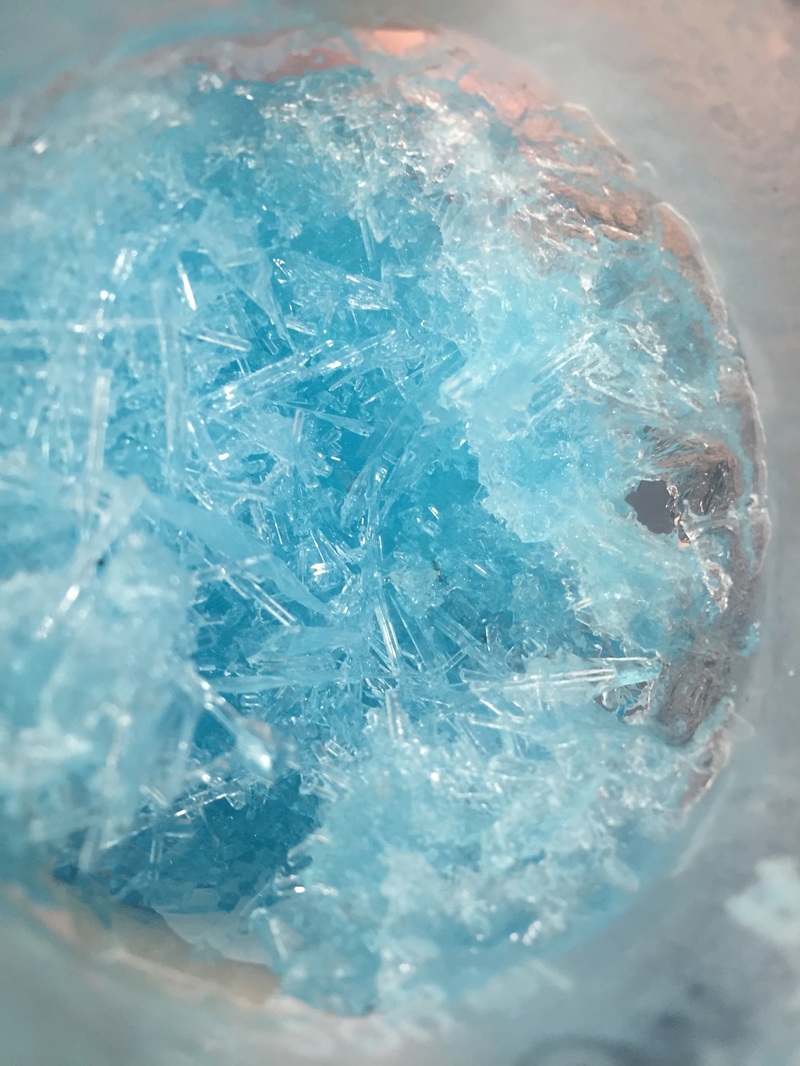 I think the outcome turned out really well, it looks like the Epsom salt crystals I found on Google. AND the crystals are actually blue, although it might just be because there's blue dye in the water that stuck at the bottom of the beaker under all of the crystals (considering how the crystals are a little transparent). The crystals, as seen in the image above, look spiky and jagged, scattered everywhere in the beaker on top and below each other. On a molecular level, the atoms and molecules are arranged in a consistent, repeating pattern, creating one of seven geometrical shapes (as seen below). 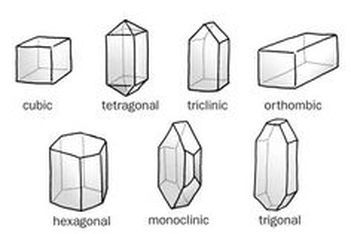 I did further research and this is what I found: The small crystals that formed in the saucer grew because of nucleation. A few alum molecules found each other in the solution and joined together in a crystal pattern. Other alum molecules continued to join them until enough molecules gathered to become a visible crystalline solid. (Chemists call that a crystal "falling out of" the solution.) I think that Morgan and I would agree when I say that we did get the desirable results. Maybe not the first time we tried the lab (when we came back the next day and there was, still, only water in the beaker), but definetely the second time. I think if we had declared the lab finished on Friday instead of Monday then we would have had less crystals in the beaker. Instead of doing that, I suggested that we leave the beaker in the fume hood for the weekend and Morgan agreed. I think I worked pretty well in this lab. When I worked with Morgan I made sure that we were sharing the responsibility of doing the lab, meaning that I think neither one of us did less than the other. I did an experiment like this one in 3rd grade, I made a snowflake-shaped crystal like the ones Mayra and Isabel made. Back then, I only cared about making a pretty ornament for my christmas tree but now I actually cared about the learning experience. I wish that we added more sugar to the water the first time we performed the lab so then we wouldn't have had to wait more time for the crystals to form. Although I am still glad that it did happen because then I wouldn't have known that the crystals don't form if there isn't enough dissolved salt in the water. I learned how to make crystals using only salt and water (not considering the other materials needed), which I previously didn't remember how to do it when I made my crystal ornament in 3rd grade. It felt very accomplishing at the end of the lab when I saw all the crystals squished together inside the beaker! I only have chemistry for one semester, and the next semester is where I will be in Spanish class. In chemistry, the semester is broken up into 4 sections(some longer than others). Semester Logistics: 4 sections, 4 weeks each Calendar Days Section 1: Mon. Aug. 24th - Fri. Sept. 18th 19 full Section 2: Mon. Sept. 21th - Fri. Oct. 16th 16 full 2 min. (SLCs during week 3) Section 3: Mon. Oct. 19th - Fri. Nov. 13th 18 full Section 4: Mon. Nov. 16th - Fri. Dec. 18th 20 full *Thanksgiving Break in middle of Section 4 *Sections scheduled for beginnings and ends of weeks I have 2 weeks left once Tuesday comes around(labor day is on Monday). This is plan for the next 2 weeks: 9/4, Friday (Today): Look through Andrew's Digital Portfolio(ie; syllabus, available lab worksheets, resources in general. 9/8, Tuesday: Prep for the crystallization lab(I am going to do this with my friend, Morgan) 9/9, Wednesday: Crystallization lab 9/10, Thursday: Make a reflection blog post on the crystallization lab 9/11, Friday: Make ice cream (with Lydia, Savreen, Morgan, and Autrina, we're going to work it out so that, with so many people, the amount of things to do will be divided) 9/14, Monday(second week that's left in section 1): Prep for making candles with Morgan 9/15, Tuesday: Making candles 9/16, Wednesday: Making candles 9/17, Thursday: Making candles 9/18, Friday: Finish any leftover blog work  Before beginning the lab, we took some notes while my teacher explained to us what a phase diagram is, where it demonstrates how every substance can either be a solid, a liquid, or a gas depending on the pressure and temperature. Every substance can be at any phase only there's 2 conditions to consider. The first is temperature and the second is pressure(or compression, another form of pressure). My teacher used a pressure gauge, and this wide u-shaped tube to show us how dry ice (frozen CO2), can turn into liquid, and then to a gas. He set the pressure gauge to 80 psi(which is about quarter of the way up the y axis in the graph to the left), and put some dry ice into the tube. Then he closed the tube shut very tightly, so that the top wouldn't pop off with all the pressure and hit someone. After tilting the tube left and right a couple times, the CO2 started to turn slushy, and then it turned into liquid. Once it turned into liquid, he unscrewed the top off and the used-to-be liquid exploded in a mess of gaseous CO2. After demonstrating that, he began to tell us the directions for the mini-lab we were about to have. The first step to this experiment was to drop a small piece of dry ice inside a beaker of H2O, then comment/observe the difference in amount of solid compared to gas. The second step was to place a small piece of frozen CO2 (1 cm in diameter) into a balloon and tie it off. Then, measure the diameter in the balloon once it completely sublimes. The purpose for this experiment was to see for ourselves how matter can change from solid, to liquid, then to gas, and have a general understanding of what a solid and a gas is by using solid CO2 and H2O. I worked with Morgan, Jennifer, and Nancy for this lab. We grabbed a beaker and filled it with water from the tap. Then we dropped some dry ice into the beaker. Immediately, the gas from the dry ice started rising from the beaker. Inside the beaker, you could see a bunch of bubbles popping up from the dry ice piece(as seen below). 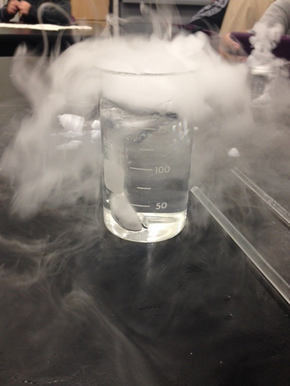 We left the dry ice inside the beaker while we did step 2, dropping a piece of dry ice into a balloon, and then tying the balloon off. We grabbed one of the bigger balloons and dropped a piece of dry ice that was 5 cm in diameter instead of 1 cm. This time, we left the balloon while we went back to experimenting with the CO2 and H2O. I occasionally glanced at the balloon to see it slowly growing larger and larger, with the gas coming off the dry ice, inflating it(as seen below). 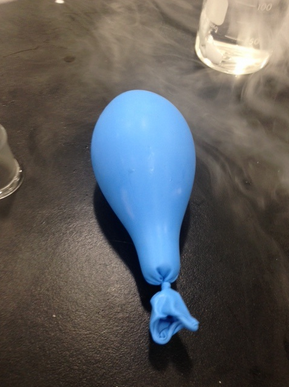 When I was watching the dry ice and the gas rising from the beaker. I most intrigued by the gas, it's just cool to look at. I grabbed a funnel that was sitting on the table and placed it on top of the beaker, the tube side facing up. The only place for the gas to go was up into the tub-y part of the funnel. The gas came up in little circular puffs of smoke. It reminded me of Absulum the Caterpillar from Alice in Wonderland, with his little circle shaped puffs of smoke. Unfortunately, I don't have a picture to post of it, but I did see Nancy taking pictures of it so I'll ask her. Andrew came by and he showed us how to make bubbles and something else. He used this thin little telescope looking tool to make the bubbles. He showed us that if you dip it into a mixture of glycerin and normal dish soap, and you make the bubble. Then you carry the beaker that has the dry ice and H2O in it to the bubble that's still floating in the air, (and you successfully avoid popping the bubble)the bubble will stick to the top of the beaker and the gas rising from the dry ice will, instead of just rising into the air, will go into the bubble(as seen below). Then the bubble just sits there until you pop it and the gas gets let out(as seen below). 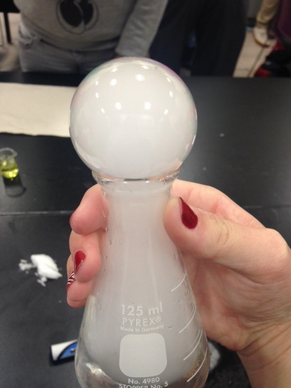 I was surprised that getting the bubble to sit on top of the beaker was probably the hardest part because, well, it's just blowing a bubble. It should be easy to do but this time it wasn't. Morgan wanted to see what would happen if you put the soap into the beaker with the dry ice. Once you did that, a whole bunch of bubbles kept on rising and dripping down the side of the beaker(as seen below). I didn't expect so many bubbles to just rapidly rise out of the beaker. I thought the top of the water was just going to be bubbling a lot when Andrew mentioned to avoid putting soap in the beakers. 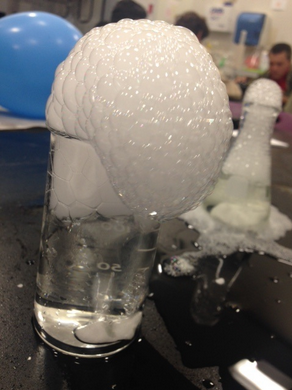 After experimenting with the dry ice and bubbles, we measured the diameter of the balloon once we knew that all of the CO2 was in its gaseous phase of matter. It ended up being 22 centimeters in diameter. The reason for that specific instruction became clear after everything was put away and cleaned up. Andrew showed us an equation that could give you the ratio of a solid piece of CO2 to gas of the dry ice. 4/3 x π x r^3 Solid CO2 Volume 4/3 x 3.14 x (2.5, 2.5, 2.5) = 65.416 Balloon Volume 4/3 x 3.14 x (11, 11, 11) = 5, 572 Ratio from solid CO2 : gas of the dry ice 65.416 : 5,572 I found this lab very entertaining and I'm very glad I got to do it because now I have a better understanding of the phases of matter then I ever have before. From doing this lab, I learned what a phase diagram is and how it works. What a pressure gauge is because I've never seen it before and now I know what it can do. I learned a neat way of inflating balloons without having to waste a breath. I've never put dry ice in water before so now I can say I have done that. I learned an awesome way to make bubbles. And finally, I learned the workings of the three phases of matter. Here's a video I took, with Jennifer's phone, of some of the lab we did:
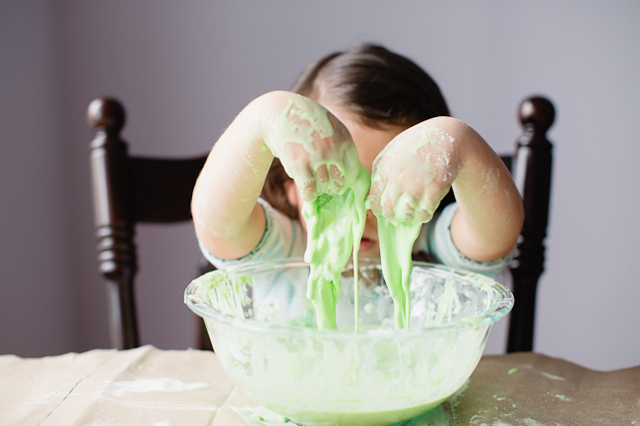
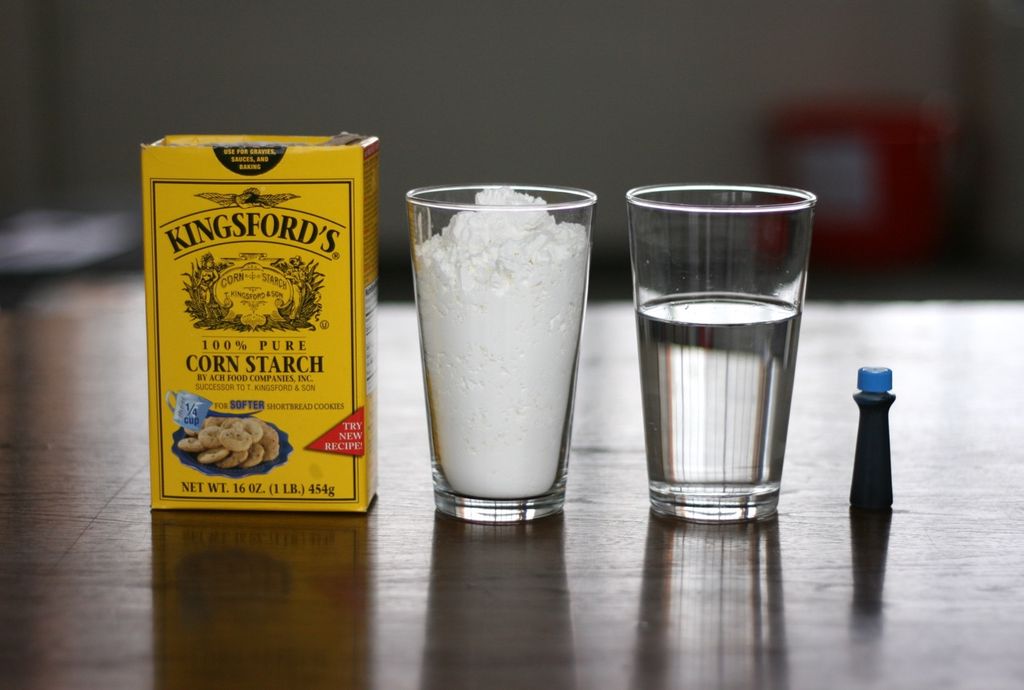
Today we did our first lab of the year. The purpose of the lab experiment was to, first, demonstrate how well we know the safety precautions of our chemistry classroom, and second, to learn about and get firsthand experience of how 2 of the phases of matter work. Before we began the lab, we took notes on a mini-lecture my teacher led. The lecture was about the phases of matter; solids, liquids, and gases. My teacher went over the definitions of science, chemistry, matter, mass, substances, elements, atoms, and finally, the three phases I just mentioned. We discussed how molecules will pack tightly together in solids, and liquids(however, in liquids, they can slide past each other unlike in solids), and they move freely with large distances between them in gases. For this lab, I worked with Morgan, Jennifer. To begin the lab, we poured cornstarch inside a plastic bowl, then we tried adding water to the cornstarch at a 3:1 ratio like the teacher said but we weren't careful enough. First, I pinched the oobleck with my fingers and tried lifting it out of the bowl when it felt like I had a good grip on a "solid" piece of it, only for it to turn into liquid and drip back down. Then, I tried tapping it quickly with the tips of my fingers. It kind of felt like jello, it was solid but you could feel that It wasn't completely solid. After playing with it a little bit inside the bowl, we thought the oobleck might "work" better if it was on the table (which the teacher said was okay to do) and all the water and cornstarch wouldn't have to be so confined anymore. I think putting it on the table made the oobleck feel not so liquidly anymore. The oobleck was getting everywhere so I tried to mush it all back together by pushing it towards the rest with my fingers sliding against the table. Where my fingers were pushing the most, was where the oobleck wasn't sliding over the rest in liquid form. It became clumped up, like it was turning into a solid again. Then, we tried holding it in our hands like a ball. We learned quickly that the only way to keep it from dripping all over our hands back onto the table was to gently squeeze it every other second. From all of these little experiments, I learned that when you applied pressure to it, the oobleck turned into a solid, and to keep it solid, you had to constantly put pressure on it. If the oobleck was left alone in your hands, it would drip and drip and drip. Or if it was left alone on the table, the oobleck would just sit there flat like a pancake. I think oobleck is both a solid and a liquid. It can be placed inside a bowl, but won't take the shape of the bowl when it's taken out. I think it's weird that it doesn't bounce, it makes me wonder about what's happening when it's falling. Does it momentarily turn into a solid when it's falling and a table counter acts as the pressure pushed against it? I think that the molecules can slide past each other only when it's not being touched by anything other than what it's sitting on. And the molecules become packed tightly together when pressure is forced on the oobleck, but occasionally, in some places in the oobleck, molecules are given just enough space to slide past other molecules giving the oobleck that squishy effect even when pressure is forced on it. These are only my predictions, so I can't be sure. Overall, I had a lot of fun doing this lab and I'm glad I had this hands-on experience. |
AuthorHey there! I'm currently in 10th grade at High Tech High in Point Loma, San Diego, California. This is my first year in Chemistry 1, and 2 and this is my class blog. You can learn more about who I am in my 'About Me' page. Archives
November 2015
Categories |


 RSS Feed
